Thursday 19 December 2013
Friday 6 December 2013
Evaluation
Working with special effects this term
has been extremely interesting and I was very intrigued to get started on this
project to see what I could come up with! ‘Brave New World’ – A concept I see
as something out the ordinary. I began researching into various African tribes
and their way of life. Scarification became a big inspiration and every scar
they had told a story.
I knew I wanted to create an innovative
design that was inspired from African tribes, however wanted to add a twist –
that being more westernised. Therefore of paling the skin down, as obviously
many of the villagers in Africa are black. I felt it would look totally
different on someone white.
With that being said, that then brought
me to my idea of researching into albinos and I found that they were greatly
frowned upon and some were killed for body parts, I also noticed not many were
part of tribes and I was interested to see if any African albinos had gone
through any scarification – Unfortunately I couldn’t find any anywhere!
Therefore decided to emphasise the
paleness of albinos and embrace that, which inspired me to design a look of
just using mainly white over the face and body and creating areas that looked
like scarification.
I firstly did find it hard to find ideas
that were elaborate and different, I honestly didn’t want to go down the tribe
style, but really struggled with finding inspiration from anywhere else.
However, I am glad I stuck to my concept
and when researching, I began to enjoy blogging about my ideas and what
inspired me.
I was very happy with my final outcomes
and loved creating both looks! If I were to go back I would of maybe researched
more. Nonetheless, it was a joy to play around with colour, prosthetics and
various materials that created something very different to what I had done
before.
T E C H N I C A L F I L E S I G N O F F S H E E T

T E C H N I C A L F I L E S I G N O F F S H E E T

Final Images


Above are my two final images, my reasons for choosing the first image, as I love the huge contrast between the skin and black background. I experimented with a white and black backdrops, however felt the white made the skin look washed out and the overall image look washed out.
Here are few of my other images taken on both shoots. - You will be able to see a range of angles of the make-up design.

I wanted to include this image, as I love the way you can see how 3D the scarification is.


Mood Board & Story Board


To finalise my project I created a story board of aspects that helped create my final designs.
Understanding My Concept
So now I have figured out my final ideas, I obviously got here through researching and finding inspiration in order to get to here, my final design. I thought I would recap briefly on my research and concept to ensure I understand the meaning behind my designs and how I got here. As stated in previous blogposts I was greatly inspired from african tribal markings and firstly wanted to create an westernised version and found the idea interesting to see what these type of markings would look like on white skin, which finally gave me the idea of african albinos and found a huge influence from the beauty of their skin and the qualities they portray. I also wanted to shed some positive light on african albinos - due to the fact that they are sometimes frowned upon in african villages and seen as outcasts, obviously due to their skin. African doctors have officially said they believe albinos are magic and have the ability to cure illness. Resulting in the albinos being hidden everyday from poachers in case of their limbs being amputated in order to add to medical potions.
So that being said I wanted to create a look that will embrace the beauty of albino skin and create scarification as it isn't often you will see an african albino apart of a tribe. So as for scarification, I create my design on my face chart and kept it reasonably symmetrical, however thought it would be relevant to go into a little more depth and create a meaning behind the scarification I create in my final design. Also to ensure I have more of an understand behind the concept of my final design.
M E A N I N G O F S C A R I F I CA T I O N
So the way I see it is that scarification is a very similar concept as tattooing. However tattoos seem to not show up as well on black pigmented skin. Which is where scarification came in and became socially valuable. Scarification involves in cutting or puncturing the skin, some more profound depending on the type of tool used. In Africa, scars were used to signify courage, strength and fortitude. - Also enhancing beauty and being socially acceptable. (In both men and women)
Going through scarification was highly valued and the type of pattern depended on the quality of the artist and obviously the tolerance of pain. As you can imagine can be extremely painful yet beautifully complex. To create an incision of the scar, they will use a sharp object (such as, a knife, glass, or stone) in a way to control the shape of the scar tissue.
As for a woman, her tolerance of pain signified her maturity and willingness to bear children. The scars would also portray the difference between each tribe.
It seems that scarification in many parts of Africa are dying out and are only normally seen on the elderly.
Seeing as I designed my tribal scarification on the face I decided to look into the meaning of facial scars and it seems it is possible to identify one tribal group to another. I feel this fits in quite well with the fact I chose to design the scars on the face, as it is inspired from african albinos, it's a positive thought to apply the identity scars on the face, as it is almost like I am creating an identity for albinos as it seems most of the time they can never be apart of a tribe, sometimes they are even abandoned by their own family.


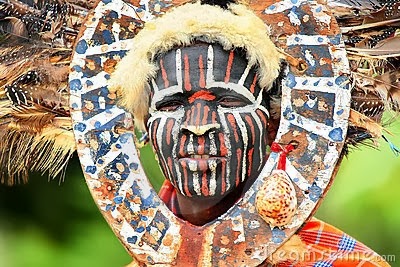
Above are two images that I found inspiration from when producing my design.
http://www.ezakwantu.com/Gallery%20Scarification.htm
So that being said I wanted to create a look that will embrace the beauty of albino skin and create scarification as it isn't often you will see an african albino apart of a tribe. So as for scarification, I create my design on my face chart and kept it reasonably symmetrical, however thought it would be relevant to go into a little more depth and create a meaning behind the scarification I create in my final design. Also to ensure I have more of an understand behind the concept of my final design.
M E A N I N G O F S C A R I F I CA T I O N
So the way I see it is that scarification is a very similar concept as tattooing. However tattoos seem to not show up as well on black pigmented skin. Which is where scarification came in and became socially valuable. Scarification involves in cutting or puncturing the skin, some more profound depending on the type of tool used. In Africa, scars were used to signify courage, strength and fortitude. - Also enhancing beauty and being socially acceptable. (In both men and women)
Going through scarification was highly valued and the type of pattern depended on the quality of the artist and obviously the tolerance of pain. As you can imagine can be extremely painful yet beautifully complex. To create an incision of the scar, they will use a sharp object (such as, a knife, glass, or stone) in a way to control the shape of the scar tissue.
As for a woman, her tolerance of pain signified her maturity and willingness to bear children. The scars would also portray the difference between each tribe.
It seems that scarification in many parts of Africa are dying out and are only normally seen on the elderly.
Seeing as I designed my tribal scarification on the face I decided to look into the meaning of facial scars and it seems it is possible to identify one tribal group to another. I feel this fits in quite well with the fact I chose to design the scars on the face, as it is inspired from african albinos, it's a positive thought to apply the identity scars on the face, as it is almost like I am creating an identity for albinos as it seems most of the time they can never be apart of a tribe, sometimes they are even abandoned by their own family.


Above are two images that I found inspiration from when producing my design.
T R A D I T I O N A L A F R I C A N F A C E P A I N T
African face paint can be worn for many reasons such as, religion, tribal rituals, identity, or scaring ones enemy.


http://www.ezakwantu.com/Gallery%20Scarification.htm
Final Designs
F I R S T D E S I G N - 'P U R E T R I B E'
For my first look, as discussed recently on my blog, I would like to symbolise Albinism in a way of beauty and purity - Due to the fact of how badly effected African albinos are treated. When really they are just like every other person, however they are seen as a massive outcast and many believe albinos are somewhat magic and can cure illness...many horrific events have taken place in the past few years because of this. Therefore I would like to shed some positive light upon the beauty of their skin. I also researched into the fact that I couldn't find any albino who were part of a tribe or at least had traditional african make-up or scarification - Which gave me a thought on what light skin look would look like when scarred as intensely as they have. So I was inspired to create a design that portrayed a westernised version of an African tribal look and embracing the paleness whilst creating my own scarification design. I went with symmetric designs across the face and simply kept everything white. Even though the look is quite simple using just white, I felt it will quite striking and effective with the 3D scars across and down the face. Because I will be applying a white foundation all over the face and body, I didn't want to loose dimension, therefore will use a a matte taupe brown along the contours of the face and collar bones, to not only add depth but also add a little colour.
P R O D U C T S
CREATING THE SCARS - (before all make-up) Using Tuplast, apply from tube (face chart showing diagram)
FACE - Illamasqua skin base in white (All over face, neck, chest and arms)
EYES - With mascara wand, dip in white and coat the eyebrows and eyelashes by combing the white through thoroughly.
Lips - White supra colour
POWDER - Illamasqua (applying at the end)
CONTOUR - Using Illamasqua blush in Disobey - hollows of the cheeks, eye socket and collar bones.
H A I R
Slicked back straight with gel
combing a little white through the roots
F A C E C H A R T & S T Y L I N G


S E C O N D D E S I G N -
As for my second look, I decided to base my idea on the tribal scarification and traditional african face paint and researching into what their scars signify. A couple of elements from the first look will be used, such as hints of white face paint. However overall the look is very different, from the use of colour and shapes and different special effects.
I wanted a simple element of scarification on the face by creating gelatine spots, I didn't want to use too many or too big as I wanted it quite subtle yet effective.
I will use black face paint (supra colour) to create strong contour on the cheek bones, applying the product with a straight edge to create that precise line. Everything in this design is quite symmetrical, similar to the first look. To add some contrast and a link to the first look I will use hints of white, being on the lips and underneath the eyes and bottom eyelashes. When I think of african face paint, I instantly see colour, therefore wanted to add some yellow to signify traditional african face paint.
P R O D U C T S -
 BLACK SUPRA COLOUR - COUTOURED CHEEKS (TRIANGLE SHAPE)
MAC WHITE LIP MIX ON LIPS AND UNDERNEATH EYES
YELLOW SUPRA COLOUR TO ADD TRIBAL MARKS
GELATINE SPOTS ON FOREHEAD (AS SEEN ON THE RIGHT)
H A I R -
I want most of the attention on the face and to create a clean slick look, however to create more of an elaborate style, and a little bit more interesting, to add a big backcombed bun on top of the head. - The model I am using has very long hair, therefore will have a much bigger bun than the one on the right.
F A C E C H A R T & S T Y L I N G


Experiments
Before creating my final design, I create a couple of experiments to see what works best, below is a design that was inspired by the african albino concept, with the scarification design also. I experimented with Tuplast, painted the face white and then took the Tuplast off to see the effect it would create, I actually loved the jaggered edges and the pink tone of the skin, that almost makes it look like a real scar. However I wanted a more 3D effect so felt using the Tuplast would be a better option to create the african scarifications.

Here I practiced one of my face charts, as I wanted to see how the white face and black lips turned out - along with using latex glue to create the tribal scars.
I do love the look and the strong contrast however I discussed before I wanted to portray sense of purity within my work and feel the black lips is a little too harsh.
The latex glue didn't work as well as the Tuplast as I thought it was a little runny and didn't dry as quick either. Although I would still keep in mind the texture in gives for future looks.


Below I was experimenting with gelatine and using larger spots on the face, however felt these were a little too big and I felt they didn't really blend into the skin like the flatter ones I tried, I wanted them to look almost like they were apart of the skin.

Below is an example of the size of the scarification spots I would like to use in my final look. I feel the look quite subtle yet effective.

Subscribe to:
Posts (Atom)